javbike
Hellcat
Ha ha love itHey, I never said I was smart, but I do get it...eventually.
lol how many wives did it take
Ha ha love itHey, I never said I was smart, but I do get it...eventually.
lol how many wives did it take
")
Jav, check out this thread Tidalwave just started. If you have any questions just give me a shout.Simon is there a way you can take a picture of the notch been filed down
Well, I actually married her twice! I know, some people aren't happy making a bad mistake just once.Hey, I never said I was smart, but I do get it...eventually.
lol how many wives did it take
Good for you dude glad to found your soul mate some people never do I divorce after 25 years and found mine we are very happy finally got it rightWell, I actually married her twice! I know, some people aren't happy making a bad mistake just once.
The 1911 experience was in round two.
Thank God, He sent me my soul mate, after my own heart.
We have been married now for almost 35 years.
Like I said, I'm not particularly smart... but I am persistent.
And...God is merciful.
So I brought the idiot scratch thing I don’t know how to use it but I bought it ha ha I don’t want my gun scratch up thanks for the heads upSounds like some of you should visit this web site and make a purchase: Idiot Scratch Prevention Tool Official Website
I hope it's not too late!
Watch their video. Make sure the mag button goes in the hole of the tool. Everything should line up.So I brought the idiot scratch thing I don’t know how to use it but I bought it ha ha I don’t want my gun scratch up thanks for the heads up
CongratulationS!Good for you dude glad to found your soul mate some people never do I divorce after 25 years and found mine we are very happy finally got it right
i have a roll of some thin plastic that is often used to seal my windows during the winter. and NO, it is not like Saran wrap, that i could use, for this. i cannot say how thin it is, but it certainly is way cheaper than that website. i think the entire roll cost me $6.00 at the hardware store for like 10 feet of it.Sounds like some of you should visit this web site and make a purchase: Idiot Scratch Prevention Tool Official Website
I hope it's not too late!
You are certainly right. I use the flat sides of milk containers to make mine. I use a hole cutter to fashion the hole for the mag release button.i have a roll of some thin plastic that is often used to seal my windows during the winter. and NO, it is not like Saran wrap, that i could use, for this. i cannot say how thin it is, but it certainly is way cheaper than that website. i think the entire roll cost me $6.00 at the hardware store for like 10 feet of it.
i'd check at hardware stores first.
you just need function, not fancy-schmancy
Good to knowi have a roll of some thin plastic that is often used to seal my windows during the winter. and NO, it is not like Saran wrap, that i could use, for this. i cannot say how thin it is, but it certainly is way cheaper than that website. i think the entire roll cost me $6.00 at the hardware store for like 10 feet of it.
i'd check at hardware stores first.
you just need function, not fancy-schmancy
another thing, i had not thought of, thanks.You are certainly right. I use the flat sides of milk containers to make mine. I use a hole cutter to fashion the hole for the mag release button.
Thanks for the pics it helps a lotIt occurred to me that link I posted above was to a conversation and might not be able to be accessed. Here’s the info on filing a notch in the take down lever.
Basically the idea is that you file a small notch in the take down lever where it contacts the plunger pin. This allows the plunger pin to gradually be pushed back rather than being forced back. I’ve attached pictures that show what I did. It’s not the prettiest, but it works. My Ronin was a dog to reassemble because of an extremely stiff plunger. I did this to my RO too. The link below is a lengthy thread from 1911 forum explaining how to do it. I found that it went very slow getting the groove started but once a groove started to form it happened quickly. You will need a set of needle files to do this
View attachment 18609View attachment 18610View attachment 18611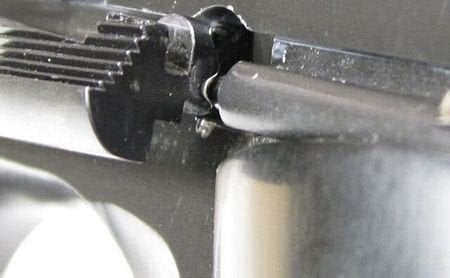
Idiot Scratch Proof
This is a modification I do on just about all slide stops as it allows easy installation and doesn't affect function. It is easily done with a needle file. To install, the slide stop is positioned directly on top of the plunger and you can feel it saddle over it and push it straight in. Bingo...www.1911forum.com