testtest
You are using an out of date browser. It may not display this or other websites correctly.
You should upgrade or use an alternative browser.
You should upgrade or use an alternative browser.
Prodigy Slide Lock
- Thread starter KevMeist
- Start date
Oh yea, it’s probably machined steel, it will last forever more then likelyI had to look up MIM. I guess the EGW part "should" be better then.
Reply
Generally, people freak out about MIM because the internet told them to. In this part, however, since it's a high-stress part (even with low "impact"), it's probably worth tool steel. The slide stop pin is what feeds through the link on the bottom of the barrel and "pulls" it down during unlocking, and especially if it's loose, it's taking more stress and impact than it should.
Past that, low impact/low stress MIM parts are generally fine. Your car engine is full of them.
I had to look up MIM. I guess the EGW part "should" be better then.
Generally, people freak out about MIM because the internet told them to. In this part, however, since it's a high-stress part (even with low "impact"), it's probably worth tool steel. The slide stop pin is what feeds through the link on the bottom of the barrel and "pulls" it down during unlocking, and especially if it's loose, it's taking more stress and impact than it should.
Past that, low impact/low stress MIM parts are generally fine. Your car engine is full of them.
Does have over a 1000 rounds through it. This slide lock has been tight from the get go. My index fingers are not the best either for pulling the slide back and removing the slide lock. I have some arthritis going on for both of those fingers.Or use really thin oil (FP-10, Kroil) on the "back" side of the pin on the right side of the slide.
That, and put 1000 rounds through it. That'll help work things in.
If you're willing to use a file and some bluing paste, the work on the slide stop to make a small little indent to make it easier is less than a half hour.
If MIM is done right, there’s no issues, I think it’s just when MIM first came out many years ago, they were not very well done, I do remember when you do a trigger job on MIM parts, you can’t go to far stoning them since there just surface hardened.Reply
Generally, people freak out about MIM because the internet told them to. In this part, however, since it's a high-stress part (even with low "impact"), it's probably worth tool steel. The slide stop pin is what feeds through the link on the bottom of the barrel and "pulls" it down during unlocking, and especially if it's loose, it's taking more stress and impact than it should.
Past that, low impact/low stress MIM parts are generally fine. Your car engine is full of them.
S
SL66
Guest
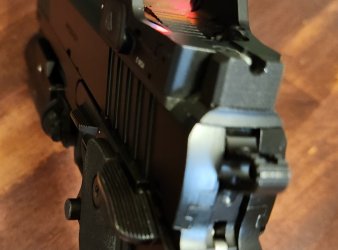
Have this slide stop, as well as EGW lightened hammer two tone ignition kit with shortened sear and ball head disco. EGW HD Ambi safety. Red dirt size 3 flat faced trigger. Slide stop was drop-in, measured same diameter as factory with digital caliper. Ignition kit required some light stone work at hammer and sear, was fine but wanted smoother action. Ambi safety required fitting of lug. End result is pure satisfaction. Trigger is a smooth Crisp 2.5lbs.This is the one I was looking at:

Prodigy Slide Stop Blue 9MM
The ultimate slide stop upgrade for your Springfield Prodigy. Fully machined from solid tool steel in the USA for a precise fit and reliable slide lock. Replaces factory MIM parts.egwguns.com
Attachments


S
SL66
Guest
Nice. Mine is 5" comp as well. Great shooting there.Looks like a soView attachment 93171Looks somewhat setup like mine. I have an OLight light on mine. Looks to be like a nice thumb rest on the EGW slide lock. Best pistol I have shot. My Prodigy is the COMP version.
Article by Ayoob about inserting a slide stop
On many a used 1911 pistol you will find a semi-circular scratch on the left side of the frame just beneath the rear of the slide stop. Where does it come from? Well …
 A close-up shows the common “idiot scratch” on the frame of a 1911 pistol. It’s a cosmetic mark caused during reassembly. Image: Gail Pepin
Some of the manuals tell the owner that when reassembling the gun from a field strip they should just push the slide stop in when it’s in line with the appropriate notch on the slide. The problem is, the plunger is in the way. The user quickly figures out that if they start with the rear of the slide stop down under the plunger just a little bit, they can push up and in almost effortlessly with the little stud on the inside of the slide stop pushing the plunger aside. And voila, we have the idiot scratch.
The term “idiot scratch” came from 1911 purists. I’m not sure I can agree that it’s “idiocy” to take a shortcut to reassembly if the only damage it causes is a minor finish blemish, but if you want to avoid it, here’s how.
 The photo illustrates a careful reassembly step on a 1911 pistol. The author uses a ball point pen to control the plunger while the slide stop is seated correctly. Image: Gail Pepin
You’ll feel like you need three hands, but you can do it. Assuming the pistol has the G.I. bushing configuration John Moses Browning designed, just leave the spring hanging out from under the bushing for now, bring the slide back as shown in the accompanying photo, and use a small flat-head screwdriver to hold the plunger back as you insert the slide stop straight in until it is seated. I’ve found the tip of a ball-point pen works well in lieu of the screwdriver.
The Infamous Idiot Scratch
On many a used 1911 pistol you will find a semi-circular scratch on the left side of the frame just beneath the rear of the slide stop. Where does it come from? Well …
Some of the manuals tell the owner that when reassembling the gun from a field strip they should just push the slide stop in when it’s in line with the appropriate notch on the slide. The problem is, the plunger is in the way. The user quickly figures out that if they start with the rear of the slide stop down under the plunger just a little bit, they can push up and in almost effortlessly with the little stud on the inside of the slide stop pushing the plunger aside. And voila, we have the idiot scratch.
The term “idiot scratch” came from 1911 purists. I’m not sure I can agree that it’s “idiocy” to take a shortcut to reassembly if the only damage it causes is a minor finish blemish, but if you want to avoid it, here’s how.
You’ll feel like you need three hands, but you can do it. Assuming the pistol has the G.I. bushing configuration John Moses Browning designed, just leave the spring hanging out from under the bushing for now, bring the slide back as shown in the accompanying photo, and use a small flat-head screwdriver to hold the plunger back as you insert the slide stop straight in until it is seated. I’ve found the tip of a ball-point pen works well in lieu of the screwdriver.
Bear103
Elite
I finally got a chance to field strip my new Operator. I used a very small/thin flat blade to depress the plunger I’ve seen some take a file and put an angle/remove material on the slide stop too. I need to find a video on that. Have not had any issues with the stock Prodigy slide stop or the EGW when reassembling.
I finally got a chance to field strip my new Operator. I used a very small/thin flat blade to depress the plunger I’ve seen some take a file and put an angle/remove material on the slide stop too. I need to find a video on that. Have not had any issues with the stock Prodigy slide stop or the EGW when reassembling.
There's a picture in post #2.
Bear103
Elite
I must have scrolled right by the link thanksThere's a picture in post #2.
S
SL66
Guest
My EGW slide stop for Prodigy came with notch in lug. No issues.
