
Where Should I Mount a Light or Laser on My AR?
![]() May 28th, 2023
May 28th, 2023
![]() 5 minute read
5 minute read
Some of us grab an AR-15 when we hear a bump in the night. If we do, that AR better be equipped with a light or laser, or both, since bad people can use the darkness to hide and attack. A good tactical light can push darkness out of the creases and crannies of the landscape and architecture, helping you to identify a threat as well as stop it.

Where you mount a tactical light or laser is important because you need to be able to access the light quickly, with ease, and without additional movement. The unit should not obscure your field of view either. In fact the accessory should be as easy to use as iron sights or an optic. So where should a tactical light/laser be mounted on an AR-15? It depends on the type of handguard you have and whether you shoot left- or right-handed. Let’s dive in and consider the details.
12 O’Clock Position
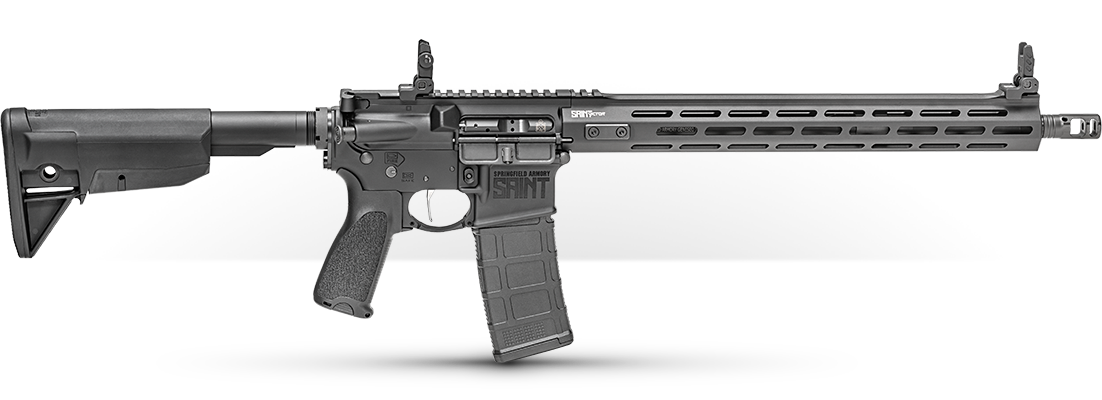
I’m using a Crimson Trace Rail Master Pro CMR-301 laser/light combo unit and a SAINT Victor 5.56mm 16” barrel carbine in this example. This unit blasts darkness with a 1,000 lumen light and uses a green laser to pinpoint targets. It can attach to Picatinny rail or an M-Lok handguard and can be operated with pressure pad or tail-cap.

What I like about the unit is it is built with an aluminum housing and the battery is rechargeable. It also has two modes: momentary on and constant on. Remember, turning a tactical light off is just as important as turning it on. You don’t want to be lighthouse beacon and draw fire or attention.

Since this unit combines a laser and light, and it has a low profile, I think the best option is to mount the unit in the 12 o’clock position on the handguard. I prefer the unit as far forward as possible. Since the unit is low-profile, it doesn’t get in the way of my primary optic — a red dot. The unit also does not get in my line of sight, and it’s designed to straddle the front sight so the light beam is to the left of it and the laser to the right.
Turning Back the Clock?
Personally, I’m not a fan of mounting a unit like the CMR-301 in the 6 o’clock position since you may already have accessories on the bottom of the rail like a bi-pod, sling swivel or a vertical grip. The bottom side of your rail may also be used on a rest, and the light/laser unit could take more of beating than it really needs to.

An alternative to mounting the unit on the top side of the rail is to mount either on the left side or right of the handguard depending on whether you are a right-handed or left-handed shooter. Right-handed shooters should mount the unit on the right side at the 3 o’clock position, and left-handers should mount it to the left side of the handguard at the 9 o’clock position.
Live The Armory Life. The latest content straight to your inbox plus an automatic entry to each of our monthly gun giveaways!
Mounting the unit this way means the unit will not obstruct either your view or your peripheral vision. This set-up also won’t block targets as you transition from left to right or right to left. I am a right-handed shooter, so I’d mount the unit on the right side of the handguard and as far forward as I can so it’s not in the way of my support hand.
Under My Thumb
The next thing to consider is the location of the remote pressure switch. The easiest way to determine the mounting location for the on/off button is to look at your support hand thumb and where it most naturally falls on the handguard when you are shooting. Do you cup the handguard in your support hand in the traditional shooting technique or use a bore-over or thumb-in-line grasp? Either way, your support hand thumb should operate the light/laser no matter what technique you use to shoot your AR. The activation switch needs to work with your normal shooting technique.

I like the thumb-in-line grasp, and I also prefer the switch to be ambidextrous. So, I place it in the 12 o’clock position behind the unit. If I used the traditional hold method, I’d mount the switch on the left side of the handguard in the 9 o’clock position.
If you have extra cable, use a couple of zip ties to keep them tight against the handguard. A loop hanging off the handguard could easily snag on gear or the environment you find yourself in.
Good to Go
With the laser/light unit mounted to your AR-15, the last step is to zero in the laser if you are running a combo unit and not just a light. The best time of day to zero a laser is in lower-light conditions since it’s much easier to see the green dot, which is also most likely when the laser will be used anyway.

Optimal sight-in distance is 25 yards, as any farther away and I think you should be using a primary optic. Lasers are best used as a close-range aiming device, and as a result they don’t replace iron sights, red dots or rifle scopes.
Adjusting a laser is a lot like adjusting a scope or red dot. Turn the laser on and aim at the target. Fire three rounds and observe where the hits are in relation to where you aimed the laser. The laser dot should follow the holes, so adjust the laser to where your group is. Take three more shots and you should be good to go.
Now that your tactical light/laser unit is mounted to your AR-15 you are ready to defend and defeat darkness.
Editor’s Note: Please be sure to check out The Armory Life Forum, where you can comment about our daily articles, as well as just talk guns and gear. Click the “Go To Forum Thread” link below to jump in!
Join the Discussion
Featured in this article

Share


Continue Reading
Did you enjoy this article?

 61
61
Springfield Armory® recommends you seek qualified and competent training from a
certified instructor prior to handling any firearm and be sure to read your owner’s manual. These
articles and videos are considered to be suggestions and not recommendations from Springfield Armory. The views
and opinions expressed on this website are those of the authors and do not necessarily reflect the
views and opinions of Springfield Armory.
Product prices mentioned in articles and videos are current as of the date of publication.

Robert A. Sadowski
Robert A. Sadowski has written about firearms and hunting for more than fifteen years. He has trained with some of the country’s finest firearm instructors in handguns, rifles/carbines, shotguns and long-range shooting. He is the author of numerous gun books, including 9MM — Guide to America's Most Popular Caliber, a #1 New Release on Amazon. He is a contributing editor to numerous gun-enthusiast magazines and websites, including Combat Handguns, Black Guns, Gun Tests, Gun Digest, Gun World, Ballistic, range365.com, SHOT Business, and others. He also edited Shooter’s Bible Guide to Firearms Assembly, Disassembly, and Cleaning; 50 Guns That Changed the World; and Gun Traders Guide.
