
Thinking Outside of the Box — Defensive Handgun Deployment
![]() June 29th, 2019
June 29th, 2019
![]() 6 minute read
6 minute read
In terms of defensive handgun deployment, getting the handgun into the fight — if you are unlucky enough to find yourself in one — is key to your survival. The problem is, most of us (yes, even including me at times in the past) are practicing techniques that might not meet the “stimulus/response” test.
The great benefit of practice is that it makes you better at what you practice. The downside to practice is that it makes you better at what you practice.
Read those last two sentences again.
You will perform like you practice because of a process called “myelination” (Google it). We write programs in our brains by doing something repetitively. The problem is that the program we write might not be the one we want to run in certain circumstances. A skill program is technically not possible to delete once it’s been built, even if it was incorrect.
We want to make sure to write the correct program, and stimulus/response is part of this equation.
So how does this relate to defensive handgun deployment?
Well, consider the following:
- The last time you went to the range, did you practice drawing the handgun and shooting?
- If so, how did you practice that skill?
- Based on years of watching how people train, I am guessing you set up a target 2-5 yards away and simply practiced drawing and shooting.
- Since you are training for self-defense, you know the distances you will likely be involved in a fight are very close, so that is the range you practiced at, right?
So is there anything wrong with what you are doing? The answer is not a simple “yes” or “no,” but rather an “it depends.” Hear me out on this. There have literally been hundreds, if not thousands, of gunfights videoed and analyzed, and how those fights occur teach us a thing or two.
First, we learn very quickly that most people do not stand still when involved in a fight for their life. They run, duck, jump, turn, sprint and do a myriad of other movements that are related to the situation. They also shoot from non-standard positions while leaning around an obstacle or something that might be used as cover.
Additionally, we find that there are distances where human beings are in close proximity and are often drawn into standing wrestling matches, often times grabbing at the weapons that their opponents have or are going for. If you doubt this, look at how often police officers have had their own guns used against them. There is an entire holster industry devoted to retention holsters simply because bad guys don’t stand still and let police officers draw their handguns and shoot them.
So what’s the point?
What We Know
- Movement is a big part of a fight: Survivability probably goes up if you use it to your advantage.
- Don’t just grab the gun: At close ranges, simply drawing the gun and expecting the bad guy to let us might fail. Train to respond with a different solution.
- Practice the best responses: If your practice does not ingrain this, then no matter how good your technique is, you might be missing a big part of the training equation. We can fix that.
Drill, Drill, Repeat
The key to practicing the best responses is to set up simple drills with a few key stimuli. You can practice responding with the appropriate tool at the right time. In the following breakdown, the three tools I’ll outline to increase survivability are movement, combatives and proper weapon-deployment timing.
I am going to give you three drills on which to work, each performed from a different distance and designed to work a different set of stimulus responses. You will shoot from standard, two-handed shooting positions in each drill. One-handed, close-quarters positions are not the goal in this post or these drills. We will cover that material in the future.
Keep in mind: This article does not cover the particular steps of the draw process. If you are not well-versed in that skill, I recommend you read up on that separately
Before you drill, remember:
- All drills should be practiced dryfire (unloaded) first.
- Observe ALL safety and muzzle direction rules during these drills, regardless of movement pattern.
- Make certain your holster retains your gun securely, even during movement.
- Vary the number or rounds (1-4) you shoot in this drill, so you do not build the habit of shooting only once or twice.
- Prioritize accuracy — make yourself get good hits.
- Practice each drill at 50-75% speed (including movement and weapon deployment) to ingrain correct skill. Speed up as your skill allows.
- Practice one or two drills during each practice session. Master the skills on which you are working, rather than attempting to swallow too much at once.
Drill One: Very Close-Range Threat / No Cover or Obstacles Available
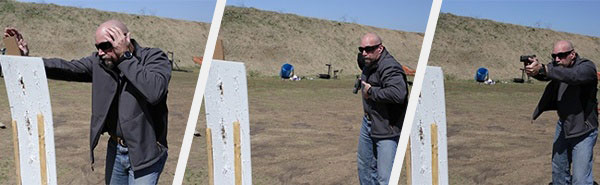
Stimulus: Threat at close range.
Response: Use combatives and create distance, then draw.
Target: Set International Defensive Pistol Association (IDPA) or similar cardboard target one yard away from your starting position. (Tip: Mount two targets as securely as possible for striking.)
Goal: Ingrain the stimulus of responding with strikes and movements before creating distance and drawing the handgun. At this range, the habit of reaching for the gun first is a bad one, as the threat will often reach for it as well. Learn that always drawing right away is not always the best option.
Actions:
- Load, and make ready.
- Start one large step (one yard) away from the target, but make sure it is within striking distance or “one-step” striking distance.
- Practice throwing several palm strikes to the target’s head, then step (one or more steps) to the rear, left or right, and draw and engage with several rounds.
- Scan your area, and re-holster.
- Reset and repeat.
Drill Two: Medium-Range Threat / No Cover
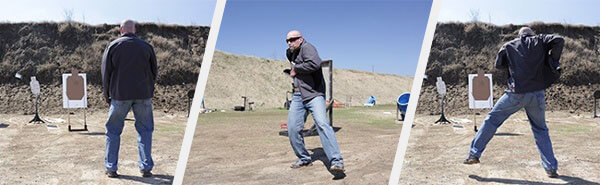
Stimulus: Threat at medium range, no cover available.
Response: Move offline while drawing.
Target: Set IDPA or similar cardboard target five yards away from your starting position.
Goal: Ingrain the stimulus of moving offline during the handgun draw. At this range, the threat is too close to strike, and there is no cover available. Aggressive movement offline (left or right) might buy you a second or two and increase your survivability. The key is to move aggressively and get the gun out as fast as possible.
Actions:
- Load, and make ready.
- Start five yards away from the target.
- Practice moving aggressively offline to the left or right while drawing.
- Engage the target as fast as possible, while making yourself get hits.
- If you imagine yourself in the center of a clock, practice movement offline toward 2, 3, 4, 8, 9 and 10 o’clock angles.
- Reset and repeat.
Drill Three: Medium-Range Threat / Sprint to Cover
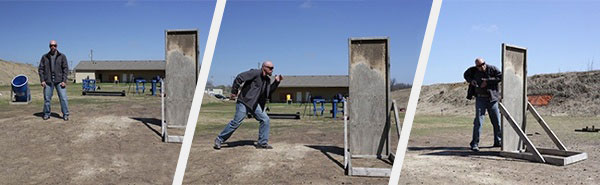
Stimulus: Threat at medium range, cover available.
Response: Sprint offline, then draw (from cover).
Target: Set IDPA or similar cardboard target five yards away from your starting position.
Cover: Set up two barricades or an object that can simulate a piece of cover. Set each barricade four yards to the left and right of your starting position.
Goal: Ingrain the stimulus of sprinting offline to get to cover and then drawing the handgun. At this range, with cover several steps away and available, you increase your survivability by moving aggressively first, then drawing. Aggressive, offline sprinting gets you ahead of the action cycle through which the threat is going. If you try to draw and move at the same time, you slow your movement down and compromise this technique. This movement is an aggressive sprint left or right to the piece of cover.
Actions:
- Load, and make ready.
- Start five yards away from the target.
- Practice sprinting aggressively offline to the left or right to the cover you have set up.
- Draw and engage the target from a good cover position with as little exposure as possible.
- Reset and repeat.
The Wrap-Up
These are three separate drills that work a stimulus/response pattern that is different than you might be used to. Add these drills to your practice sessions to ingrain proper responses that will increase your survival chances in a dynamic fight for your life.
Don’t forget, these drills should all be first performed dryfire or with some sort of training handgun, like a Shot Indicating Resetting Trigger (SIRT) or airsoft gun, to ingrain the skills on which you want to work.
Until then, train hard.
Join the Discussion
Share


Continue Reading
Did you enjoy this article?

 116
116
Springfield Armory® recommends you seek qualified and competent training from a
certified instructor prior to handling any firearm and be sure to read your owner’s manual. These
articles and videos are considered to be suggestions and not recommendations from Springfield Armory. The views
and opinions expressed on this website are those of the authors and do not necessarily reflect the
views and opinions of Springfield Armory.
Product prices mentioned in articles and videos are current as of the date of publication.

Mike Seeklander
Mike Seeklander is a nationally ranked competitor on the practical handgun competition circuit. He also has extensive formal training and experience in the military and law enforcement as an operational officer/Marine in all phases of training development. Mike was previously President, C.O.O., and the Director of Training at the United States Shooting Academy and is a combat veteran of Desert Shield and Desert Storm, with five years of active duty and four years of reserve duty in the U.S. Marine Corps
