
Editor’s Note: This is the first entry in the “Practical Skills” series from The Humble Marksman. You can find the second part on mastering trigger manipulation here, the third part on improving your draw here and the fourth part on speeding up your reloads here.
The question of how to handle recoil from a pistol is often answered the same way no matter whom you ask: you put your hands here, deliver XX% of your grip force and then the recoil goes away — until it doesn’t.
My personal results with most traditional recoil management content you can find were lackluster because most of the conversation revolves around reducing muzzle rise — but that’s only half of the picture. It took pursuing competition pistol shooting for years to understand that the key to high-speed marksmanship is managing both muzzle climb and muzzle bounce (when the slide goes back into battery).
The benefits of good recoil management don’t stop at speed shooting. A good grip is also going to increase your accuracy in slow fire and help eliminate flinch.
With a proper grip, the sights will automatically align so when you pick the gun up to your eye the sights show up ready to go.
With good recoil control, the muzzle will lift and return predictably, allowing you to shoot with confidence at a speed some may think does not offer control.
The Secret of How to Control Recoil
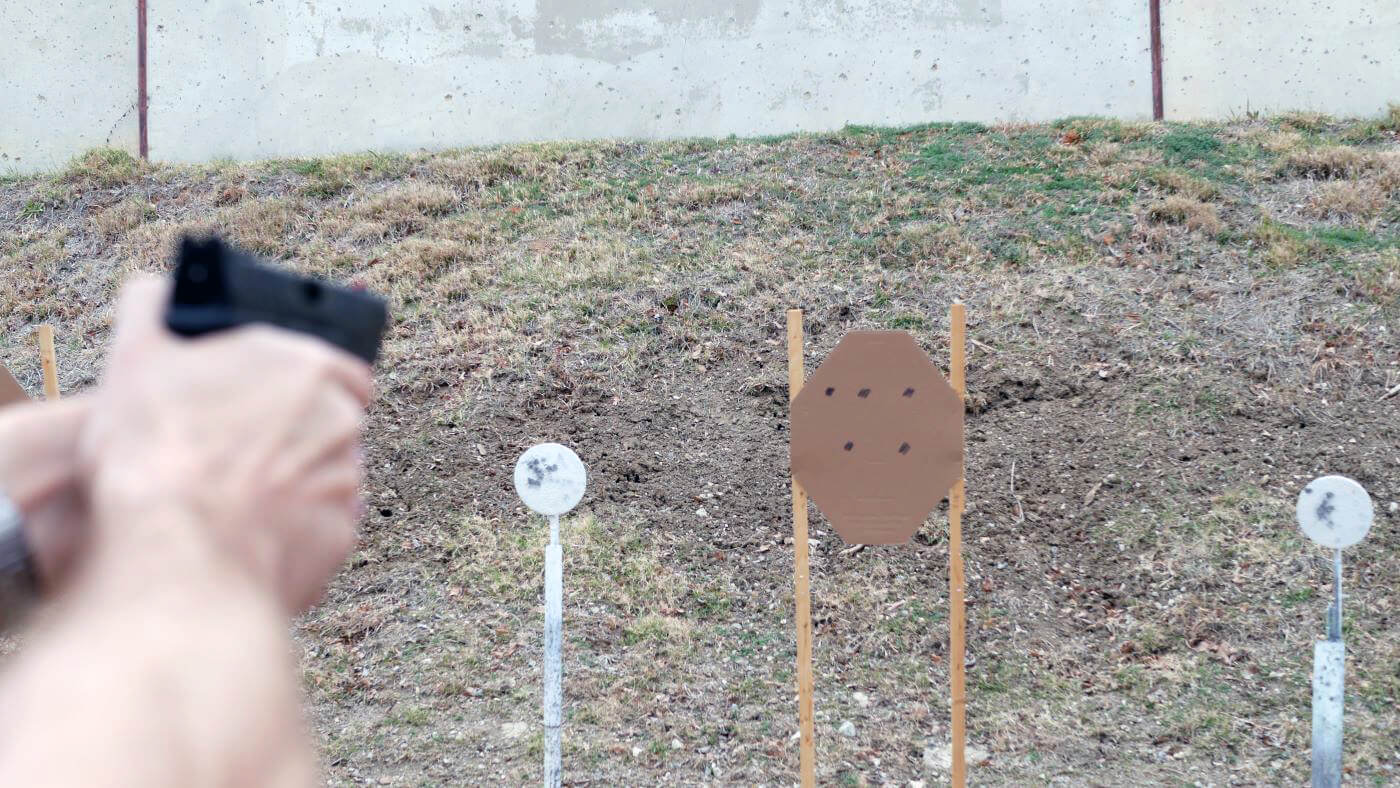
I’ll share my process for pistol recoil management and so you can reach the goal for this segment: at 5 yards, deliver five shots to a target as fast as you can pull the trigger with a group no bigger than your palm.

While this technique was developed predominantly for use in competition pistol shooting — namely for the United States Practical Shooting Association (USPSA) — it is fundamental to all pistol shooting regardless of context. Elite military units bring in top competitive shooters to train with, and increasingly the techniques from the LEO/MIL world are converging with what is practiced at the match. Fundamentals are called that for a reason.
Recoil management has three parts:
- How you place your hands on the gun
- How you hold your arms
- How you stand (stance)
Every gun and every hand is different — if the technique described here affects your trigger reach, modify as necessary so you can get the trigger pull you need. However, the concepts are going to be the same.
Pushing Back
First, let’s understand how the handgun is operating in recoil. The striker releases or the hammer falls — igniting the primer in the cartridge — the powder ignites and resulting gas pushes the bullet out of the barrel, the reaction causing the slide to open and eject the spent case until the slide bottoms out. At this point with the slide is all the way back, the excess energy causes the muzzle to lift.
This is the first force we must manage. The slide opening creates a lever where the web of your dominant hand is the fulcrum, and the front of the grip is the lever you get to pull on. The slide opening compresses the pistol’s recoil spring so when it stops the slide begins to move forward and close. Upon the slide closing and returning the gun to battery, there is muzzle dip and wobble.
Now the second lever system comes into play. Assuming you’re shooting with two hands on the pistol, the fulcrum for the slide closing is now the pointer finger of your support hand. The lever you get to combat muzzle dip with is the bottom of the backstrap of the gun where the heel of your palm is making contact.
You can measure the muzzle rise and dip with the Mantis X10 Elite training system. It will graph exactly how much movement you have during the gun’s recoil process.
Eyes on the Target
Unfortunately, reducing the angle of muzzle climb doesn’t set you up to combat muzzle dip. The time it takes for the tip of your muzzle to stop bouncing — which is the key to high-speed marksmanship — is referred to as “sight recovery”.
A good grip is going to reduce muzzle climb and speed up sight recovery — but there’s more to it than that. A good grip is also going to align your sights for you, so you don’t have to do it consciously (this is referred to as “index” or “natural point of aim”).
The grip will cause your sights to behave predictably with a perfectly neutral rise and return. A good grip will make you more accurate because it stabilizes the gun through the trigger pull, making you more accurate.
The sights lifting straight up is critically important for speed shooting. If you overpower the gun on the support side so that that sight or dot lifts up to your dominant side, when the slide closes it’s going to come down on the support side.
Often hitting “low and left” when shooting fast is misdiagnosed as a trigger control problem when it is actually a grip-imbalance problem. The problem is it’s nearly impossible to see this on a set of iron sights.
Key Takeaway: If your first shot is exactly where you are aiming but fast follow-ups are wandering to your support side or low, it’s probably a grip issue and not a trigger issue.
Practical Applications
So that’s the theory side of it — now the pragmatic side. For discussion’s sake, I’m going to use the terms “strong hand” and “support hand” to refer to my right and left hands, respectively. If you’re a southpaw, just reverse this.
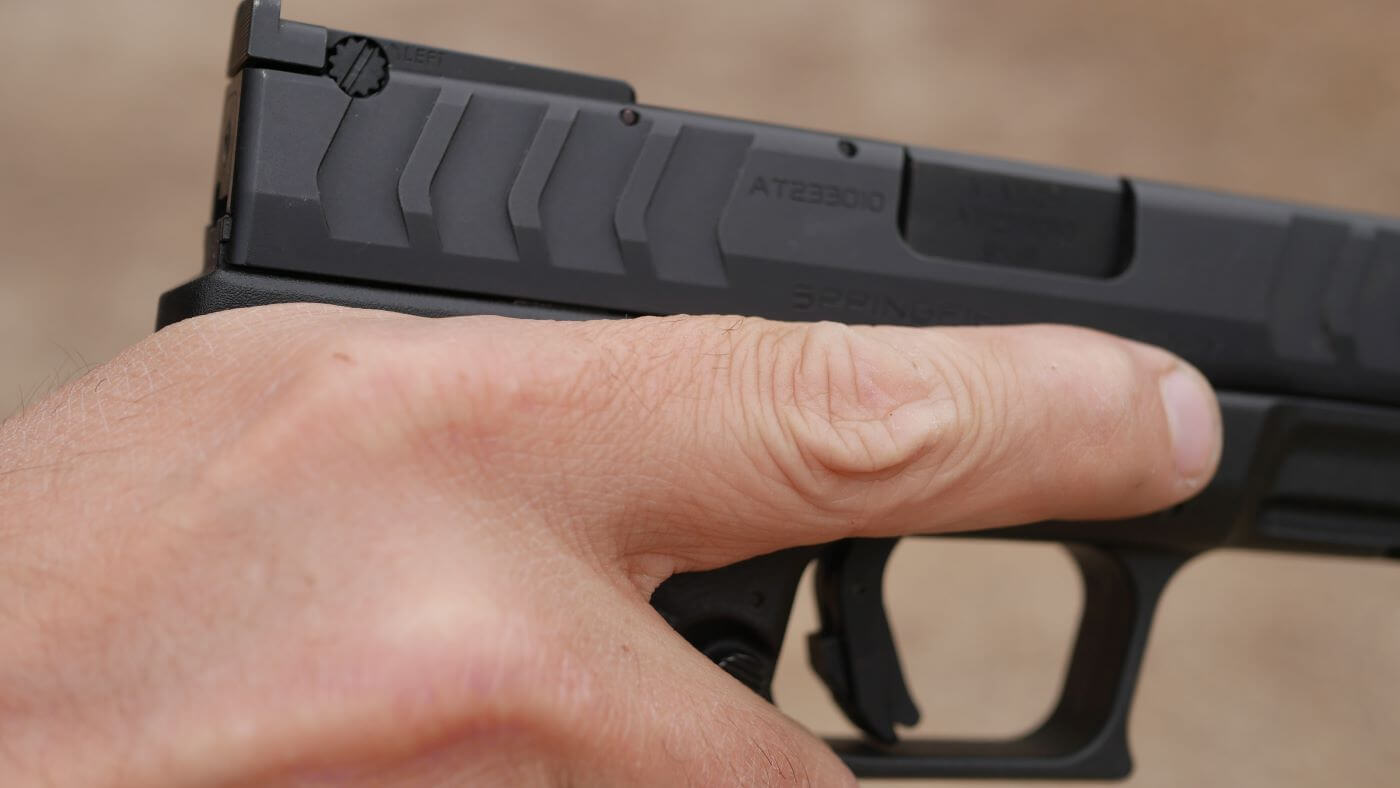
Start by getting a grip with your strong hand. Seat the gun so the base of your thumb comes around the frame. You won’t fold your thumb down, but rather keep it high as if to reach for the slide release/slide stop. You must fill up the area under the back of the slide entirely.
If you fold your strong hand thumb down, you’re opening an air gap at the grip tang on the support hand side of the gun (the high part of the frame at the back of the gun) that allows the frame to wiggle as you pull the trigger. This results in shots going to your support side and potentially low.
Many pistols have a thumb depression low down on the support side of the grip that feels good to put your thumb knuckle in — don’t do it. For firing one accurate shot, yes, you can absolutely fold your thumb down. But remember, one shot per second isn’t our goal — five shots per second is. If folding your thumb down was a legitimate technique for high-speed marksmanship, there would be someone at the top levels of USPSA or IPSC currently competing implementing it — there isn’t. If you need to move your strong hand around the gun for better trigger reach, this is okay.
Now, wrap your strong hand knuckles up under the trigger guard — as high as possible — contacting the trigger guard with your pointer finger. The direction of pressure applied by this grip is STRAIGHT FRONT TO BACK. Your fingertips will apply almost no pressure to the side of the gun. Do not squeeze the gun like you would squeeze a stress ball; squeeze it like you would squeeze a set of pliers. The grip strength used is going to vary based on your grip strength.
The “right” amount of grip strength is going to be enough to compress the skin of your palm entirely so that when the gun fires the ignition isn’t going to compress the skin of your palm. Since we’re gripping the gun with two hands, we don’t have to do it all with our strong hand strength so grip it firmly enough that you start this process while maintaining trigger finger speed.
If you’re shooting one-handed, you’re going to use much more grip from your strong hand. Finish the grip by pushing through your tip of your thumb toward the target. This shift in focus will make your grip reflexively change and help firm up our fulcrum when the slide is opening as well as stabilize the muzzle as we pull the trigger.
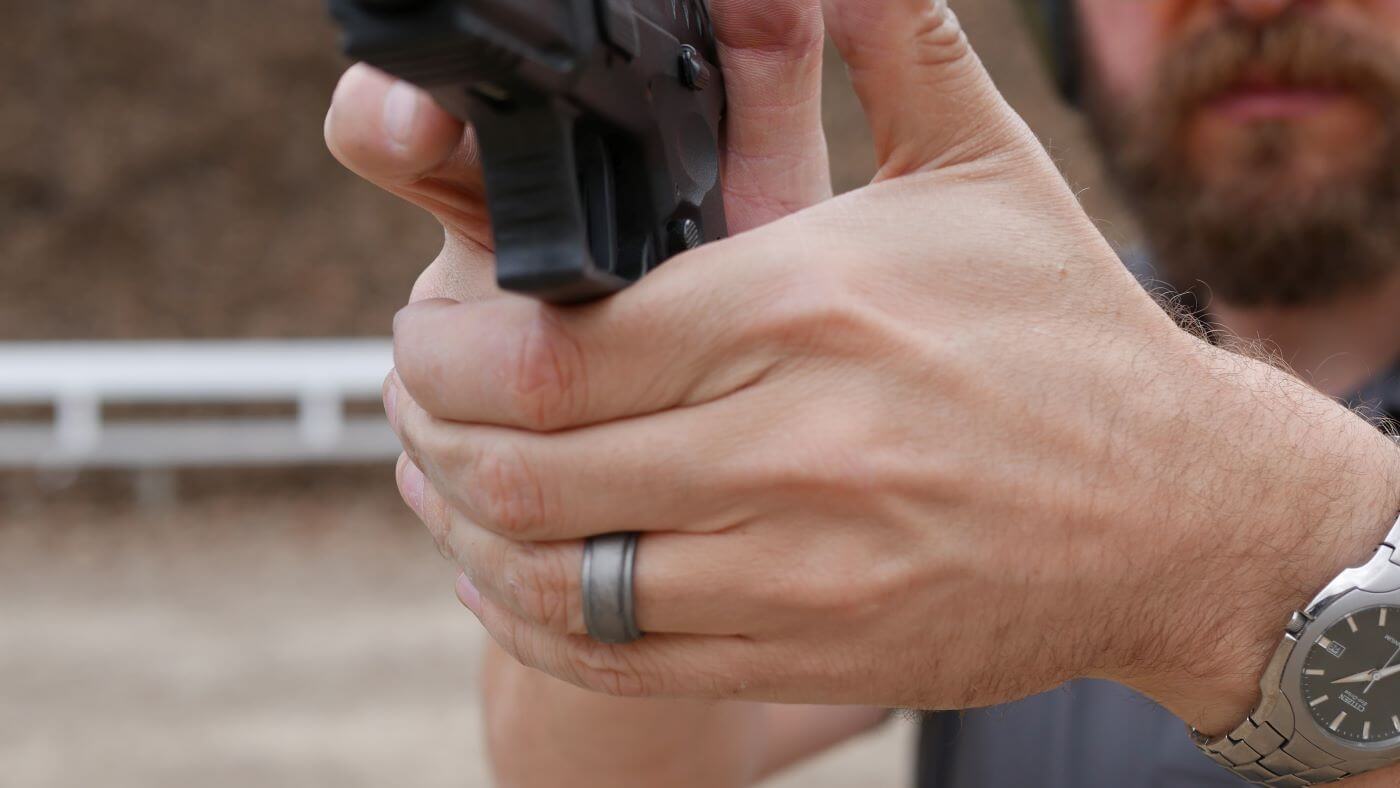
Mount your support hand by hooking the inside of the middle knuckle of our support hand finger over the outside of the middle knuckles of our strong hand fingers, then pull back onto the gun and plant the heel of your palm in the gap left behind the tips of our strong hand fingers.
Now, rotate the heel of your palm down toward the bottom of the grip slightly, which puts pressure from your support hand pointer up into the trigger guard. There is a variation of this grip where you can put the finger of your support hand up over the front of the trigger guard, but this doesn’t work great for lefties. It’s a worthy topic of discussion, but that could be its own subject for a different post.
Neutral Forces?
The force used from your support hand is in the exact direction as the force coming from your strong hand — straight front to back. Focus on loading up the force evenly along the front strap, but do not neglect the area low down on the grip from your ring and pinky fingers. On some guns, right-handed shooters may be able to pinch with their support hand thumbs on the takedown lever or frame to provide an anchor point for their pointer to provide upward pressure into the trigger guard. For many people, the thumb does nothing other than resting on the frame.
This is a neutral grip technique. While there are techniques of rolling your support hand wrist over really hard, the neutral technique seems to help people with better sight movement and is less likely to result in tendonitis from over-training.

The force used in your support hand is near 100%. You’re going to pull back hard with your fingers, which is going to press the heel of your support palm into the gun, all the while your pointer finger is pushing up into the trigger guard. This upward pressure into the trigger guard is going to cause your strong hand to want to press back into the gun harder to counteract — this is okay. Just be careful with the upward pressure from your pointer — the direction of the pressure is straight up and not up and to your strong side. The upward pressure is for your finger to maintain contact with the trigger guard throughout the handgun recoil arc. If the trigger guard breaks contact with your pointer, it’s going to create a greater wobble when it comes down and hits your finger and slow your sight recovery.
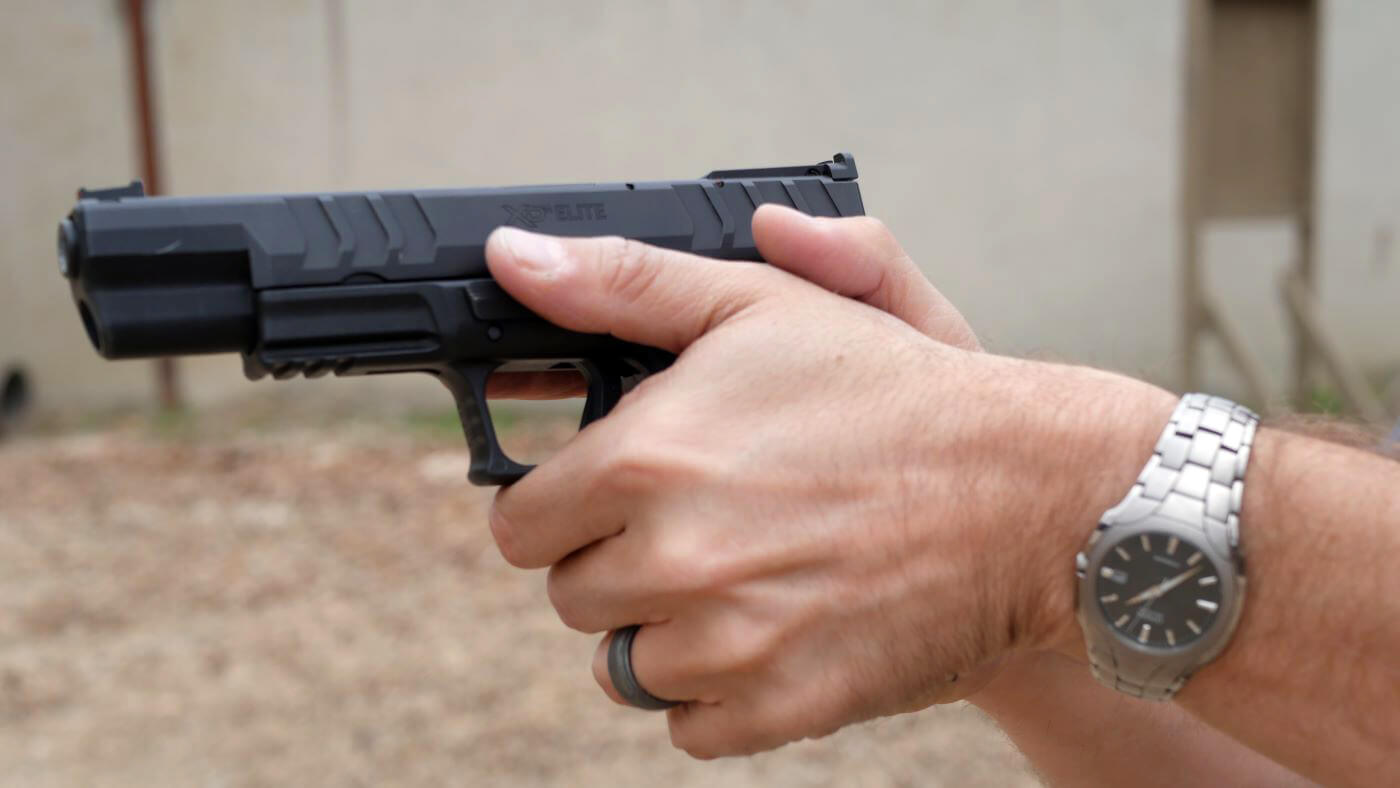
The most important aspect of any pistol grip is learning to lock out the tendons in your wrist. Present your hand like you’re going to shake someone’s hand. You should notice that your wrist is set, and your arm moves at the elbow. You must be able to flex the tendons in your wrists like this to basically 100% effort the whole time you’re shooting the gun. This will immobilize your hands to a large degree and tighten up lateral movement on the trigger pull. Wrist locking also helps with sight recovery by reducing the wobble.
Aligning Your Efforts
If you’re having a hard time conceptualizing how to lock your wrists, try to pull on the grip as hard as you can through your pinky and ring finger on each hand. You should feel a band of tension on the top of your wrist. Try and recreate that tension but keep the ability to wiggle your fingers.
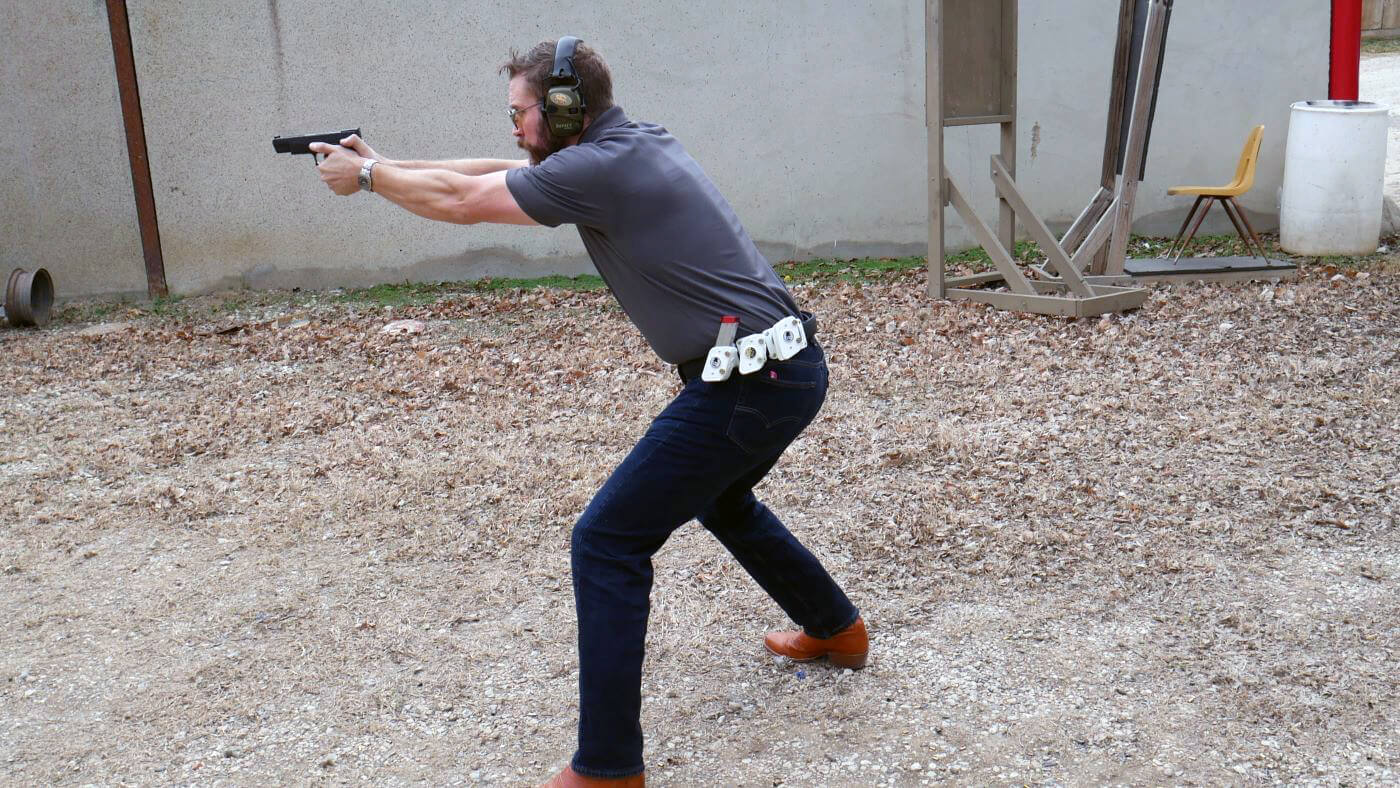
Now that we have our grip and our wrists locked out, we lift the gun up to our dominant eye. Do not dip your head down behind the sights; doing so introduces tension and rigidity which does nothing with the handgun recoil control process. Tension in your neck and shoulders will slow you down in every other gun handling situation beyond engaging a single target. Pick the sights up to your eye and roll your elbows out to point at the walls — it doesn’t have to be perfectly parallel to the ground, but closer to parallel than pointing down at the ground. With the elbow pointed at the ground, we have a hinge that allows the whole gun to lift in recoil.

If you are correctly applying your grip force, locking your wrist and picking the gun up to your eye, the sights should come up aligned. If you’re a dot shooter the dot should be on your screen, centered in the lower 1/3rd of the field of view. This is the first step to being able to lock the gun onto the target. You’ve just built a passive frame that absorbs pistol recoil. Since your wrists are locked and your muscles are appropriately tensioned, there is very little space left for flinching.
Solid Foundation
Here is where there will be a difference between larger shooters and smaller statured shooters — stance. You may scoff and say, “How much stance do you need for the recoil of a 9mm cartridge?”
Participate in an exercise for me, and get a buddy to assist. With a safety checked on an unloaded pistol, hold like you’re presenting to target with the usual “square range” stance, standing fully erect standing casually. Then have your buddy move the slide to the rear SLOWLY. There is a good chance you will be shoved backwards.
Live The Armory Life. The latest content straight to your inbox plus an automatic entry to each of our monthly gun giveaways!
Now, put your feet wider than shoulder width with the strong side foot to the rear. Begin to lower your hips until you begin to feel your quads engage. Fold at the waist to keep your shoulders over your forward knee. This may cause your hips to move to the rear. Keep your core, neck and shoulders relaxed. Now have your buddy repeat the drill above. Smaller shooters may have to get even more aggressive in their forward lean to use more of their body weight into the back of the gun.
This stance may look ridiculous in the context of a square range, but you can receive recoil all along the forward arc of your body with this stance without get shoved backward. The bonus for competitive shooters is your legs are already loaded up so you can run in any direction, and being this wide and low allows you to recruit your legs to drive the sights from target to target.
Now, assume your grip and stance and develop a “pre-flight checklist” for what you are experiencing in your hands, arms, core and legs. Really focus on where you’re feeling tightness and tension. Now, relax. Get your grip and stance again and re-create the stance and grip using the checklist you just generated. Do this several times in a row each day until it’s natural. Once you hit it consistently — try to do it faster — start standing casually, then at the drop of the hat be able to drop down into your stance and present the gun to target with a good grip as fast as possible.
Make sure you also check out Massad Ayoob’s article “Basic Two-Handed Shooting Stances”.
Range Time
To test your grip, we need to take it to the range and tune it up. Load up 10 rounds into a magazine. Put five 1” dots on the target. Send the target out to 5 yards. Run through your checklist with your grip and stance. Fire one aimed shot at the 1” circle and let the gun recoil — do not attempt to guide the muzzle down back to the first shot, let the sights settle in naturally. The goal is to see where the muzzle ends up pointed.
Usually, the muzzle will end up a couple of inches high to your strong side. Fire the second shot to confirm how high. Did your sight jump straight up out of the notch and come back down, or did it go up and to your strong side? The dot should be jumping straight up and down with as little as possible lateral movement. Make corrections in your grip to attempt to correct how the muzzle settled in from pistol recoil, in how you’re locking your wrists, pressure from each finger, etc. Repeat the drill on the second dot. Eventually, you’ll be able to get the holes to come close to touching.
Where this becomes powerful is when you stay mindful with each rep. If you’re making corrections after each rep, update your “checklist” on what you’re supposed to be feeling in your hands, wrists, arms and stance. Eventually, you’ll be able to clear a set of five dots. If at first progress is slow, focus on the positive. If initially the distance between shots is 3″, and by the end of your range time the holes aren’t touching yet — but they’re less than an inch apart — that’s a huge success. It’s a 66% reduction, even if you’re not where you want to be yet! Once you master 5 yards, you can try this at 7 yards, 10 yards and beyond. With each yard you add to this drill, the margin of error shrinks dramatically.
Editor’s Note: Be sure to check out The Armory Life Forum, where you can comment about our daily articles, as well as just talk guns and gear. Click the “Go To Forum Thread” link below to jump in!
Join the Discussion
Featured in this video
Share


Continue Reading
Did you enjoy this video?

 169
169
Springfield Armory® recommends you seek qualified and competent training from a
certified instructor prior to handling any firearm and be sure to read your owner’s manual. These
articles and videos are considered to be suggestions and not recommendations from Springfield Armory. The views
and opinions expressed on this website are those of the authors and do not necessarily reflect the
views and opinions of Springfield Armory.
Product prices mentioned in articles and videos are current as of the date of publication.

The Humble Marksman
David from The Humble Marksman YouTube Channel is devoted to practical pistol proficiency. He is classified as a Master in the United States Practical Shooting Association (USPSA) in both Carry Optics and Production and is a Master in Stock Service Pistol in the International Defensive Pistol Association (IDPA). David started competitive pistol shooting in 2013 as an avenue to become more competent with concealed carry, but fell in love with the sport. He found pursuing mastery in practical shooting carried over into all other aspects of both his shooting and his life. The mission of his channel is to help others reach new heights in their own shooting and to promote participation in the practical shooting sports.
